Xoxo, everyone — it’s Reznik, and today I’m going to tell you about our free CRM.
AlterCPA Moe is a free, but genuinely solid CRM system built for working in the CPA space. It’s a good fit for processing leads through a call center, and it helps automate logistics and warehouse accounting. Optimal for product traffic and working with info-products. No limits on the number of leads or users. A miracle, isn’t it?
Quick Overview
To start using CPAmoe, you need to register. Just go to https://ui.cpa.moe/register and enter your details. Only the company owner needs to register here — employees will get access straight from them. Your name and company name here are pure formality, just put down whatever’s convenient for you.
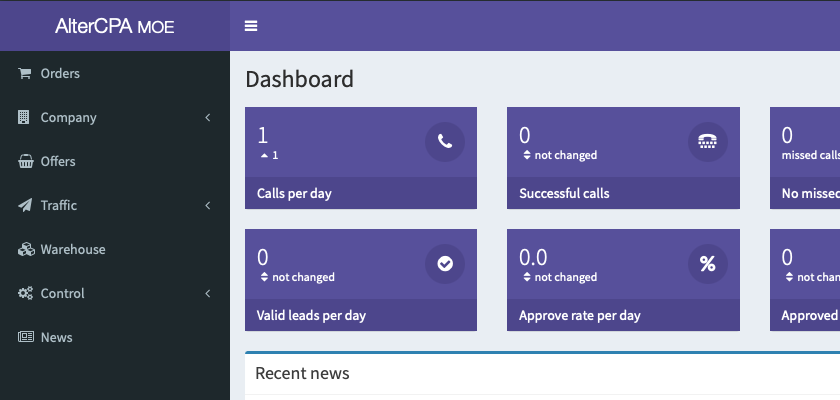
After you register, our company’s control panel will open up in front of you. On the home page, you’ll find statistics, the latest news, and documentation. But the most important stuff lives in the menu on the left:
- Orders. This is where the core work with leads happens. That’s where they come in, and where your operators and logistics staff sort through them.
- Company or Team. This is where the key metrics of your stats and analytics live. Company admins and team leads can check their operators’ work here, track order statuses, and monitor delivery success.
- Offers. This section lets you set up the list of offers you work with, add products to them, set prices, extra CRM fields, and call scripts for the call center.
- Traffic. Here you can add your affiliates, affiliate networks, or other traffic sources, and view their statistics.
- Warehouse. Lets you keep inventory records for the actual products tied to your offers, and analyze how well they do with your customers.
- Management. Handles company settings, staff and team management, extended order statuses, and delivery services.
Getting Started
So, you’ve registered. To get going, you’ll need a few minutes to do the initial setup of the system for yourself. Let’s take a quick look at what you’ll need to do, and we’ll cover each step in more detail in later articles.
Step 1. Setting Up Offers
In the “Offers” section, you need to set up the offers and products you’ll be working with. Keep in mind that an offer isn’t quite the same thing as a product — it’s a product proposition. It can include one product or several. To turn on working with products, check the “Allow adding nested products” box in the offer settings.
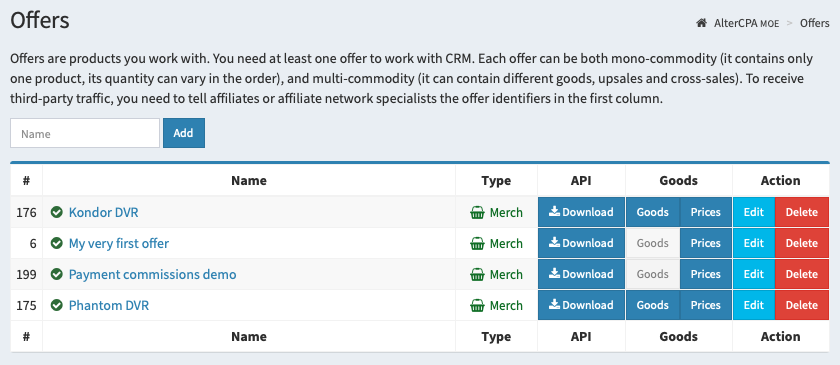
For example, if you sell dash cams with memory cards, create an offer called “DVR”, add the main product “DVR” to it, plus additional products “16GB Card” and “32GB Card”. The call center operator will see these products when working the order.
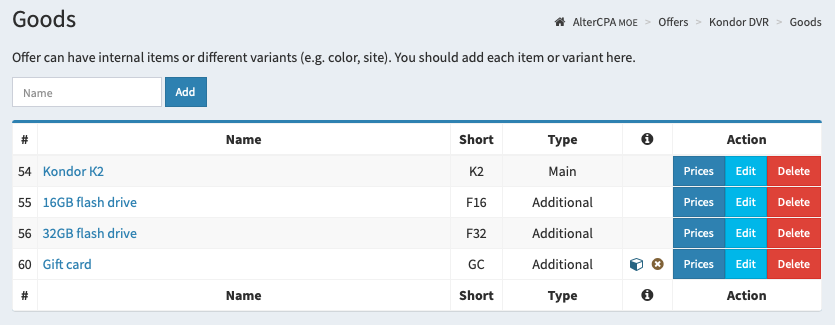
If the same product can appear in multiple offers, just add it to each offer. For example, the same memory cards might get sold bundled with different dash cams. Don’t panic if a product suddenly seems to have multiplied — you’ll be able to sort that out in the warehouse.
In the offer settings, you absolutely need to specify the countries you work with. They’re needed to set the right prices for operators. The other offer settings aren’t as critical — feel free to experiment with them on your own.
Once you’ve specified the list of countries, move on to setting prices. We recommend specifying both the price and the cost price of the product. If you’re planning to use inventory tracking, you can set the cost price later in the warehouse.
There’s no limit to the number of offers and products you can work with.
Step 2. Setting Up Staff
You can work with offers on your own, but it’s much more convenient to hand this work off to your call center operators, logistics staff, and analysts. In the “Personnel Management” subsection of the “Management” section, you can add accounts for your company’s staff.
To add an employee, just enter their name in the form at the top of the page and click “Add”. On the next page, you can set the user’s email and password, their internal phone extension, and access rights.
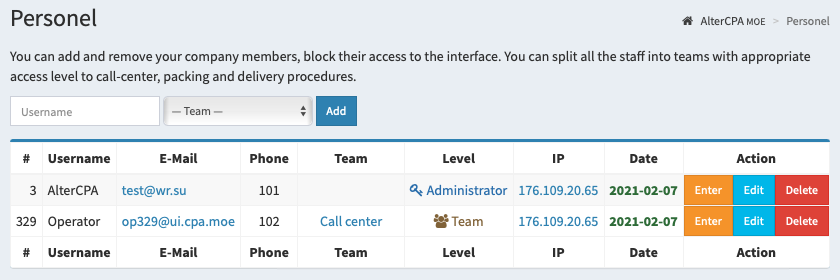
The user can log into the system with the email and password you set for them, or through a special login link. The second option is much more convenient, because it lets the user set their own familiar login and password themselves. To get a login link, save the user and click the “Login” button in the list.
Keep in mind that newly created users have access to every order in the company. To restrict their access, we recommend splitting users into teams. Teams themselves are created and configured in the subsection of the same name under “Management”.
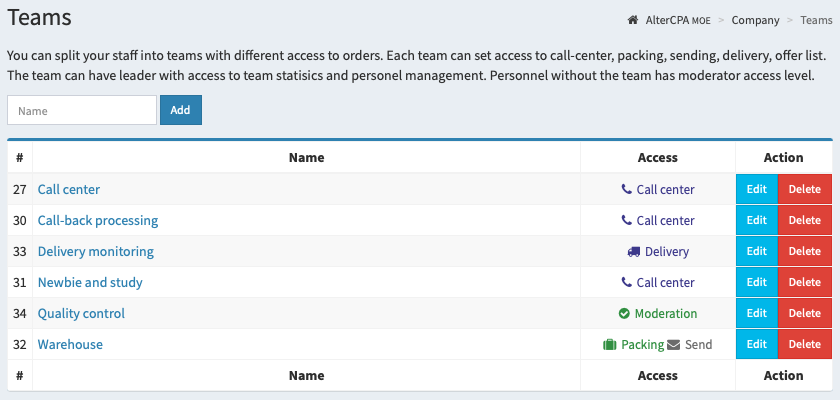
Teams let you restrict users’ access to different types of orders, to the visibility of the order list, and to phone numbers. We recommend setting up at least one team for call center operators, giving it “Call center” access with the value “Priority: new – call back – hold” and the “Calling mode” work mode. Once you’ve created your teams, assign users to them in “Personnel Management”.
There’s no limit to the number of users and teams you can create.
Step 3. Setting Up Traffic Sources
Your operators can add orders to the CRM manually, but it’s much more convenient to shift this work onto outside traffic sources. A traffic source can be an affiliate, an arbitrage team, an affiliate network, or any other entity capable of sending leads through the API.
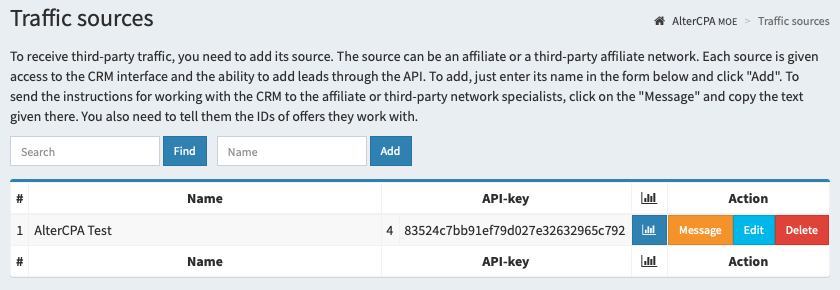
In the “Traffic Sources” subsection of the “Traffic” section, you can add a list of your affiliates. To add one, just enter a name and click the “Add” button. A page will open where you may need three blocks:
- Message: copy it and send it to the prospective “Source”. It’ll contain a link to log into their personal dashboard, documentation, and API access keys.
- Statistics: choose shortened statistics if you don’t want to show data on delivery and order buyout rates.
- Postbacks: some networks and affiliates will ask you to set up a postback link for specific events. They’ll tell you about it themselves when the time comes. For now, just remember that it’s possible, and where to go do it.
In their personal dashboard, the “source” will see their own statistics and a list of active offers. They’ll also get a magic button for downloading a ready-made API file that sends leads to the right offer.
There’s no limit to the number of traffic sources you can add, either.
Step 4. Working with Orders
Once you’ve added offers, staff, and traffic sources, leads will start showing up in your company. Well, that’s the plan, anyway. And those leads are going to need processing.
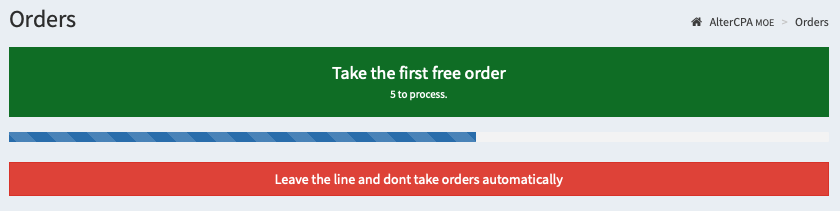
Orders get processed by operators in the “Orders” section. The heart of order processing is the big green button at the top of the page. It automatically picks the order the user can and should be working on. The button also shows how many orders are currently sitting in the queue. If the button’s gray, there are no orders yet. Operators in calling mode can hit the “Go on the line” button, and orders will start opening up for them automatically as they come in.
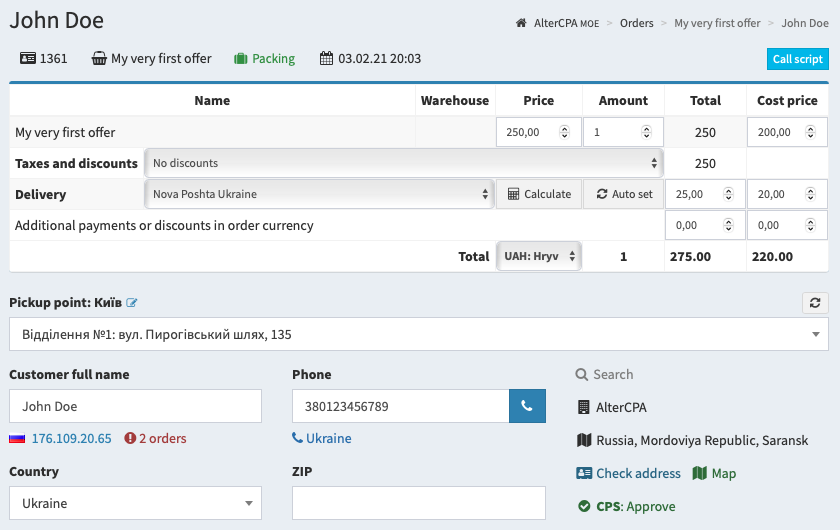
The order processing form contains all the information you need:
- Order contents – quantity, unit price, discounts, markups, shipping, cost price, order currency.
- General information – name, phone number, delivery address, email, comment, custom fields.
- Status change block lets you confirm or cancel an order, move it to the next or previous processing status, or set the time for the next call on the order.
- Status and change history of the order comes in handy for the operator when planning the conversation.
The makeup of the order form can change depending on the status, offering different available actions and opening up different fields for editing the order.
The number of orders available for processing, naturally, has no limit whatsoever.
What’s the Catch?
You’d think it’s a pretty decent CRM system — it handles call center and logistics work, there’s warehouse accounting, there’s analytics, you can spin up your own affiliates and go loot caravans with them, there really are no restrictions to speak of. So why’s it free?
Heading off your very first thought: no, we don’t sell your data, it says so in black and white in our privacy policy. Our company’s reputation is worth more than the pathetic pocket change you could offer us for that data.
First, because we can. The CPAmoe platform is built on a stripped-down AlterCPA Pro, which handles leads really fast. It costs us nothing to just keep a service like this free — it doesn’t even put any load on the server.
Second, CPAmoe doesn’t come with technical support. None at all, not even for money. Something unclear? Figure it out yourself — AlterCPA staff will just shrug at you.
Third, you’ll outgrow CPAmoe pretty fast. It’s missing way too much. No website tools, no click analytics, no accounting, no payouts, not even support. And all of that is right there in the full-featured AlterCPA Pro.
Fourth, don’t forget what “moe” actually means, my dear otaku. We just really love the CPA space, and we want the object of our affection to grow and pick up new devotees.
What to Do Next?
Going forward, we’ll get into more detail about every aspect of working with CPAmoe. Subscribe to our channels on social media, check out the other articles in this series. Or better yet — experiment with the interface, read the documentation and the tips, and try everything new.
That’s it from Reznik — xoxo, everyone!