Xoxo, Reznik here and today I’ll tell you about AlterCPA One
AlterCPA One is a cloud-based traffic filtering solution. We use smart analysis algorithms to understand if your site needs this visit or if it should be sent somewhere far away. We clean your traffic from spurious visits, search engine bots, social media crawlers and other unwanted individuals.
Where to begin?
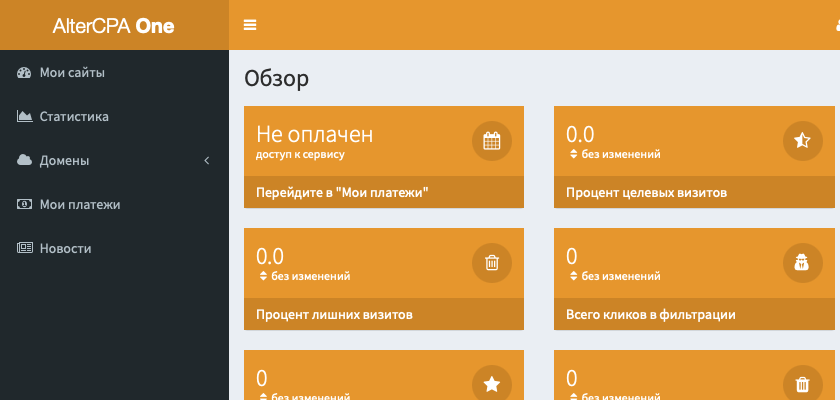
To start working with AlterCPA One, you need to register and pay for access. To do this, go to registration page and specify your name, mail and password. Immediately after registration, you will be offered to pay for access to the service.
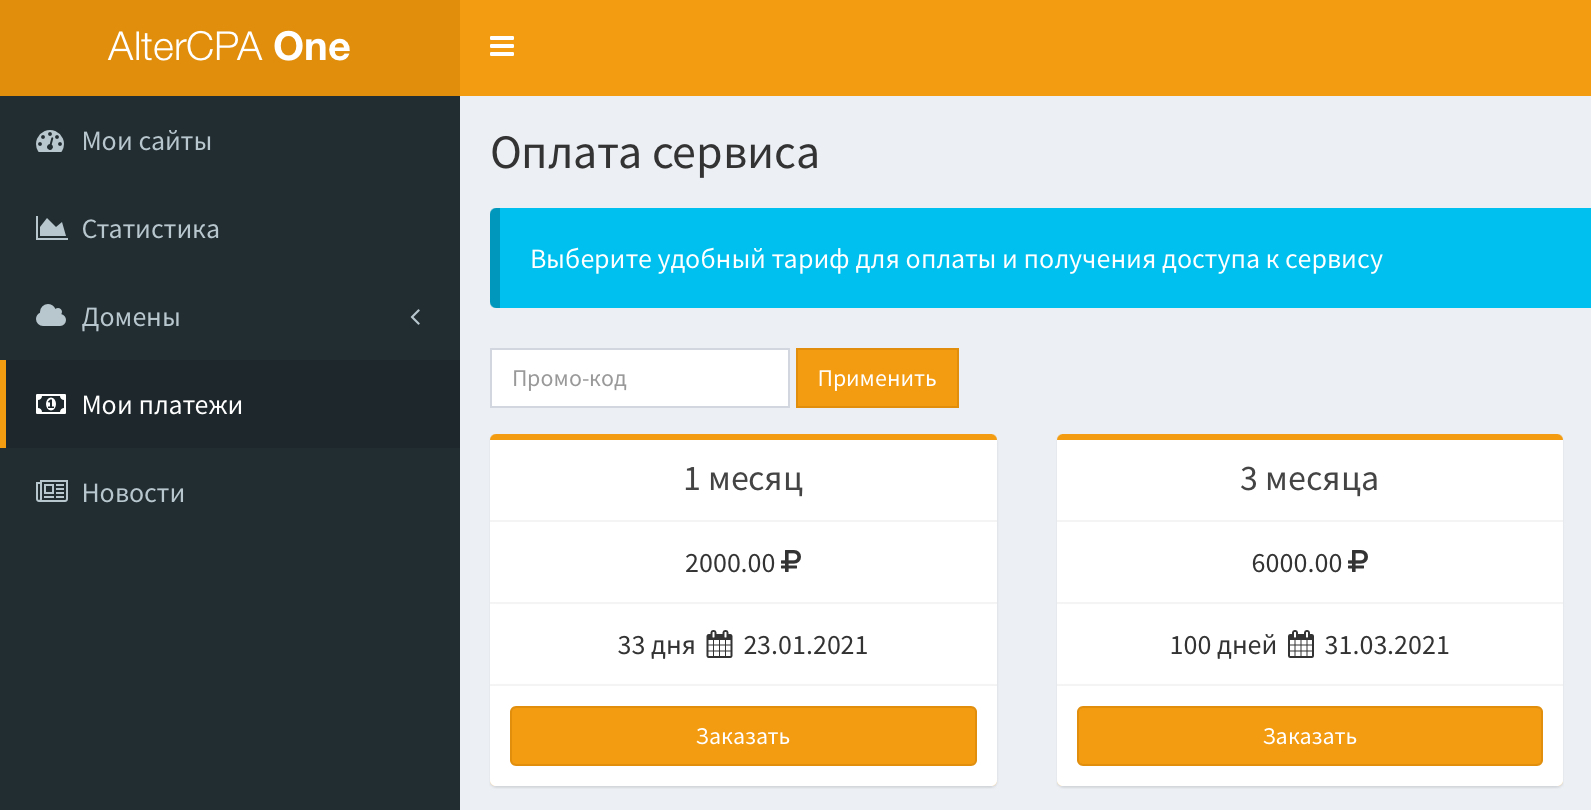
To purchase access, go to the Payments section and select the tariff you are interested in. If you are not too lazy to use Google, you can easily find a promo code for a discount, which you can specify in the field above the list of tariffs and click “Apply”.
There is no free trial period here. But no one bothers you to try to contact the developer directly and ask? You may also be asked for something in return – a review, but it’s worth it – referral program is available.
Domain parking
You will need your own domain for almost any filtering task. Of course, you can use the system domain, but we do not recommend doing this – it has probably already been added to various blacklists and is only suitable for tests.

Domain parking is carried out in the Script Parking subsection of the Domains section. In the “Domain” field, enter the full name of your domain. You don’t need to specify www, and you don’t need to use http:// either.
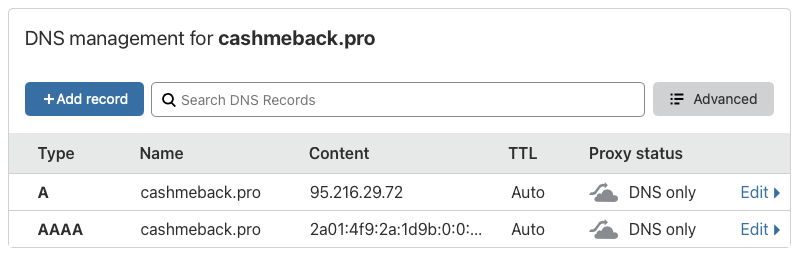
Go to the DNS zone editor in the registrar’s personal account (do not confuse it with setting up DNS servers, you just need to set up a DNS zone).
- Remove any existing A, AAAA, and CNAME records that point to the domain you want. For the root domain, their name will be @ or the domain name, for a subdomain, respectively, the name of the subdomain.
- Add a new record of type A with this name and value 95.216.29.72
- If you require IPv6 support, add a new AAAA record with this name and value 2a01:4f9:2a:1d9b:0:0:0:13
Depending on various conditions, including the phase of the moon and the strength of the torsion fields, domain binding can take from several minutes to three days. You can check if the domain is linked by clicking the “Check” button. If you press this button every 15 minutes, it will increase the speed of checking and binding the domain.
The process of parking the domain is described in more detail in the manual.
Adding site
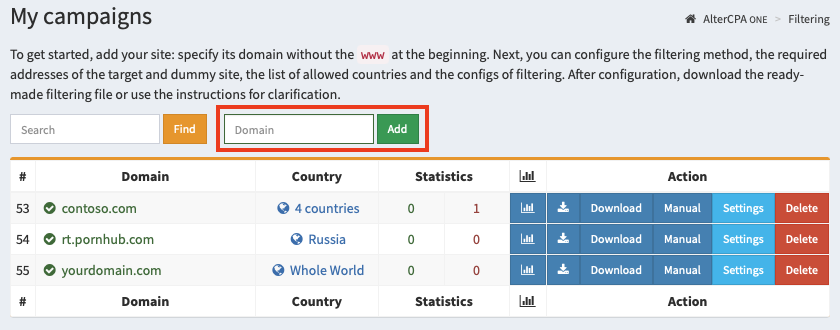
Start your work by adding a site. Sites are your filtering settings for ad campaigns. Working with sites is carried out in the section “My campaigns“.
To create a site, specify its domain in this field and click “Add”. This domain will host your filter in the future. The domain is specified without www at the beginning.
After adding a site, you need to configure the basic traffic filtering parameters:
- Domain. This domain will host your traffic filtering file.
- Work mode. Use “Automated” for real tasks and “Pause” for testing.
- Countries list. We recommend that you provide a list of countries from which you expect visitors.
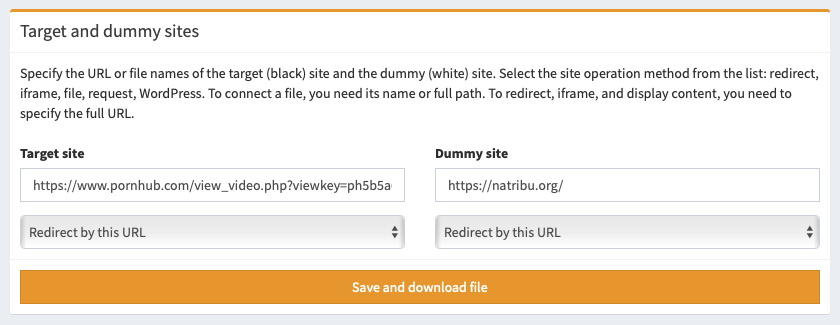
- Target and dummy sites. Specify the files or URLs of the respective sites and their mode of operation. Read more about it here.
Click “Save and download file”, place the resulting file on your hosting for the selected domain.

Site settings
You can specify additional site settings that may not match our vision of perfectly simple filtering.
Main parameters
- Domain – will be used to install the traffic filter itself in one of the convenient ways. Please note that this is not the domain of your target site, because the filter will most likely be placed on a completely different domain. Interesting fact: actually, the “domain” field can be anything. In reality, it is used only to check the headers (host or referrer) of incoming traffic. But you can check the “Ignore domain” checkbox in the site settings and specify any text.
- Work mode determines whether filtering is enabled. Automatic mode turns on the filter. A pause always shows a dummy site. A disabled filter always shows the target site.
- Countries – you can limit the list of countries from which visits will go to the target site. If no country is selected, then traffic will come regardless of its geography. We strongly recommend specifying a limited list of countries to filter out visits from bots located on remote servers.
- Target and dummy sites – in these fields you need to specify the URL or file name (only when working with a file include). Read more.
- Site working method – choose a display method for the target and dummy sites. Depending on the chosen methods, we will create a ready-made filtering file. Read more.
Extra options
- Trash visits – the filter will discard the number of visits specified in this field and show them the dummy site. Useful when testing a filter. With each call, the number in this field will decrease.
- Traffic – you can limit the list of devices from which traffic will come. There is a choice of desktop traffic and mobile traffic (any, iOS and non-iOS)
- Parked domain – if you have parked domains, you can use pick one for JS integration and redirects to work.
- IP protocol version – you can only admit visitors to your site who are accessing IPv4 or IPv6. Useful for organizing IPv6 honeypots.
- Ignore request domain – may come in handy if you use the same site to work with multiple domains or via API without taking into account the real domain.
- Check primary IP only – the filter will only analyze the main IP address and will not accidentally block your front server or CloudFlare.
- Check the visitor’s language – the filter will check the title of the user’s language and compare it with the languages from the list of valid countries. Allows you to weed out the majority of intruders.
- Filters – you can limit the list of used filters by which traffic will be checked. If no filter is specified, then filtering will be performed on all blacklists available to you. This is the best option for most situations.
- White list – requests from the specified addresses will not be checked. It is indicated one address per line. You can specify both a single address (12.34.56.78) and a subnet with a numeric mask (12.34.56.0/24).
Setting up filters
The easiest and most convenient method for installing a filter on a website is to download a ready-made filtering file. It will be generated for you automatically depending on the selected settings.
Website working methods
You can choose your method of work for the target and dummy sites. The service will automatically generate the optimal file for you, depending on the selected method.
Redirect by link
The visitor will be directed to the link you specified. You need to specify the full URL in the site field to make this method working. You can change links on the fly without downloading a new file.
Open the file with the name specified
The script will open a file located on the server using the include PHP method. In the site field, you must specify the name of the file, if it is located in the same folder as the script, or the full path to the file. You can change this name on the fly without downloading a new file.
Do not use standard filenames: target.php, dummy.php, black.php, white.php, bl.php, wh.php, w.php or b.php– to prevent an attacker from gaining access to your site with a simple search. If no file name is specified, black-index.php and white-index.php are used for the target and dummy sites, respectively.
Show the link in the iframe
The visitor will see an iframe inside which your target or dummy site will open. You need to specify the full URL in the site field to make this method working. You can change links on the fly without downloading a new file.
Make sure your site does not contain elements that are blocked when running inside an iframe. For example, requests for location or access to peripheral devices.
Show the contents by the link
The script will make a CURL request for the specified link and show its content to the visitor. You need to specify the full URL in the site field to make this method working. You can change links on the fly without downloading a new file.
Make sure that all resources used in the server response (images, scripts, styles, forms) have absolute paths with domain. The script will not parse requests to third-party paths – this feature requires a proxy.
The request can be sent using either the GET method or the POST method. Both content display and 301/302 redirection are supported. The request is made to the URL specified in the settings, additional GET and POST parameters are sent to this address.
Build into WordPress
You can embed your filter directly into your WordPress site. To install, disable WordPress updates and upload the index.php file to the server instead of the same WordPress file.
Important! You cannot use WordPress on both the target and the dummy sites at the same time, you’ll just have one site open. Use different working methods for the target and dummy sites.
A WordPress site is the perfect way to create a honeypot. From the point of view of an attacker, this is a completely legitimate site, which is also subject to classic hacking techniques. Do not forget to leave realistic contacts and information on the dummy site so that attackers do not try to dig deeper and be satisfied with getting to this resource.
What’s next?
Check the service documentation, especially the “Setup” section. It explains what methods of filter implementation you can use. Better yet, just search the web for AlterCPA One use cases from trusted webmasters.
Thanks y’all, Reznik out!